Sponge Painting Shapes for Toddlers and Preschoolers
Make circle, square and triangle prints with kitchen sponges, washable paint and paper. Allow 5 minutes to set up and about 20 minutes for painting, plus drying time.
By WonderCraft Kids Editorial Team, Editorial team · Updated 28 October 2026
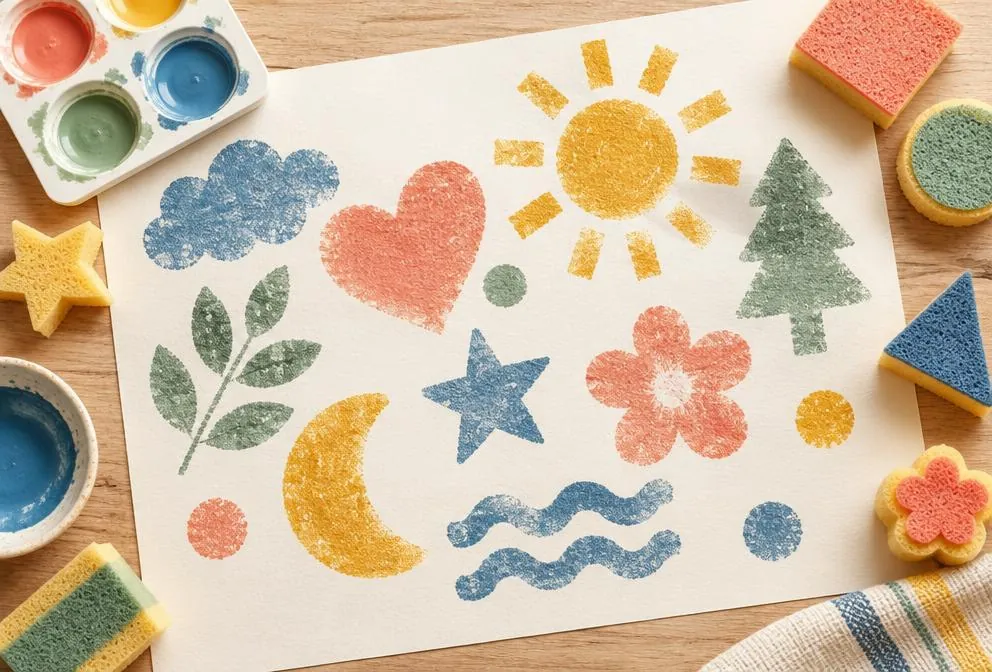
To sponge paint, press a sponge into a thin layer of washable paint, stamp it onto paper, count to two and lift it straight up without sliding. For this shape-printing activity, an adult first cuts kitchen sponges into circles, squares, triangles and strips. Children aged 2 to 5 can then choose colours and arrange their prints without needing to draw the shapes themselves. Start with one large shape for a toddler, or offer several shapes for a preschooler to make patterns and pictures. Cover the kitchen table or work outside; keep scissors and small sponge offcuts away from children and supervise throughout.
What you need
- 2-3 kitchen sponges (thin, dense sponges print cleaner shapes than thick, holey ones)
- Scissors (adult use only)
- Washable tempera or ready-mixed poster paint, 3-4 colours
- A paper plate or shallow tray for each colour
- Thick paper or card (around 200gsm curls less)
- Clothes pegs to use as handles (optional)
- A wipe-clean mat or newspaper and an apron or old T-shirt
Step by step
- 1
Cut the shapes: an adult cuts the sponges into circles, squares, triangles and a couple of long strips, roughly palm-sized so small hands can grip them. Dampen them slightly and squeeze out the water — a just-damp sponge soaks up paint more evenly.
- 2
Add handles if needed: clip a clothes peg onto each sponge if your child dislikes paint on their fingers.
- 3
Set up the paint: squeeze about a tablespoon of each colour onto its own plate and spread it into a thin layer. Thin paint gives crisp shapes; thick puddles give blobs.
- 4
Show one print: press the sponge into the paint, press it onto the paper, count to two, then lift straight up without sliding.
- 5
Let them fill the page: name each shape as it goes down (“another triangle!”) and let your child decide where everything goes rather than tidying the composition.
- 6
Dry and reuse: leave the paper flat for about an hour. Once dry, the prints can be trimmed into cards, bunting or wrapping paper. Rinse the sponges and let them air-dry before storing.
What kids learn
Shape names
Saying “circle” or “square” each time a sponge is pressed down gives children a chance to connect the word with a shape they are holding and seeing.
Cause and effect
Children can experiment with pressing hard for a solid shape or lightly for a speckled one, and see the difference straight away.
Colour mixing
When prints overlap while still wet, kids can notice new colours appearing, such as blue and yellow making green.
Make it easier
Offer one large sponge shape and two colours. For young toddlers, tape the paper to the table so it does not slide, and use pegs as handles.
Make it more challenging
Ask for a repeating pattern (square, circle, square, circle), print a shape picture such as a house from a square and a triangle, or cut letter or number sponges for older preschoolers.
Safety and supervision
- Use paint labelled non-toxic and washable, and check the age guidance on the pot.
- An adult cuts the sponges; keep scissors out of reach.
- Supervise toddlers closely so sponges and paint stay out of mouths, and keep small sponge offcuts away from very young children.
- Rinse sponges and let them air-dry — wet sponges sealed in a bag can grow mould.
Adult supervision is required for every activity on this site. Read our full child safety guidelines.
Free download
Get the FREE 20 Screen-Free Activities Pack
Twenty printable activity cards for ages 2–8, sorted by time and mess level. One email, no spam, unsubscribe any time.
Frequently asked questions
What age is sponge painting shapes suitable for?+
It works well from about age 2 to 5. Toddlers enjoy simply stamping and seeing the shapes appear, while 4 and 5 year olds can make patterns and shape pictures.
What kind of sponge works best?+
Thin, dense kitchen sponges or craft foam sponges give the clearest edges. Very thick or holey sponges print blotchy shapes, which can look nice but are less recognisable.
What paint is best for sponge painting with toddlers?+
Thick washable tempera or ready-mixed poster paint. Avoid acrylic for young children, as it does not wash out of clothes once dry.
How do I stop the paper curling?+
Use card of around 200gsm, keep the paint layer thin, and once the prints are touch-dry, flatten them under a heavy book.
Why are my sponge prints blobby or smudged?+
Spread the paint into a thin layer rather than a deep puddle. If the sponge is wet, squeeze out the water before adding paint. Press down, count to two and lift straight up instead of dragging the sponge. Try one print on spare paper before starting the picture.
What pictures and patterns can children make with sponge shapes?+
Start with free stamping. For a repeating pattern, alternate a square and a circle. For a shape picture, print a square with a triangle above it to make a house. Strips can become borders, and overlapping wet prints let children explore colour mixing. Let younger children choose where their prints go rather than asking them to copy a finished picture.
How do I clean up and reuse the sponges?+
Leave the artwork flat to dry for about an hour, checking that the paint is dry before handling it. Rinse the sponges and leave them to air-dry fully before storing; do not seal damp sponges in a bag. Once the paper is dry, trim the prints into cards or bunting if you like.